Is your WordPress site secure? After a bad hack on this site I was shocked of how ignorant I had been about basic web security. Wait, I got hacked, and now I’m offering you security advice? Well, yes.
I’m a lazy guy but I like to get things done. This meant I loved to cut corners. And that meant security tasks never got done. But, if only I’d realised how quick and easy the most important security tasks are.
However, before we launch into this epic 4000 word post, a word of warning: LinkedIn, Yahoo, and the US government have all been hacked. Some of the world’s most secure banks have been robbed. Security is about risk reduction. It’s not about risk elimination. Risk will never be zero. It’s a continuous process.
By a long way, the two most common causes of WordPress hacks are:
- weak username and password details or compromised logins
- failure to update WordPress core software, themes and/or plugins
This article will tell you the most crucial tasks that will add the greatest security to your website starting with the most important.
Here is my new course on WordPress security showing you step-by-step how to complete the following tasks.
1. Keep your software updated!
As stated above, one of the two most common causes of attacks is using out-of-date software with vulnerabilities (the other is bad user details). So, we all know that we must keep the software we use on our web servers up-to-date.
That means the versions of PHP, Apache, MySQL, WordPress core, and the WordPress themes and plugins, should all be updated to new versions with no known vulnerabilities.
To keep PHP, Apache, and MySQL updated, you need to liaise with your host (see task 19). However, keeping the WordPress core and the WordPress themes and plugins updated, this is your responsibility.
You must do this for every site on your host. Even that affiliate site you set up with huge enthusiasm a couple of years ago and haven’t touched since – you must keep it everything updated.
The easiest way to do this: install and activate Wordfence Security plugin on your WordPress site. Set it to alert you every time there is something to update (see below task number 6).
This way you’ll receive an email when something needs to be done. You won’t do it otherwise.
2. Webroot hygiene – keep your web home tidy
If you have a WordPress website, you should be seeing this sort of thing when you observe the root of the site via an FTP client (eg. Filezilla) or via a File Manager in cPanel or equivalent.
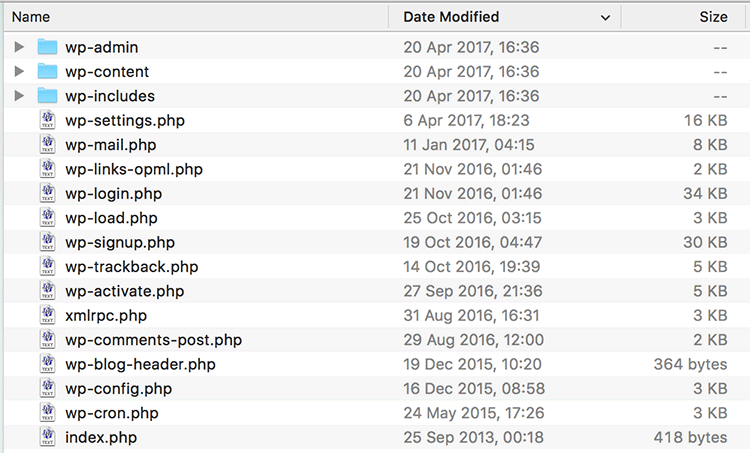
There may be other files (license.txt, Google and Facebook authentication files, for example) but you should know who put them there and what they’re doing. Nothing else should be there sitting on the server.
If you find something there and you don’t know what it is, here’s what you should do:
- Don’t delete it immediately! Ask your host to search in the logs and find out when it was put there and from what IP address. This might remind you of what it is and who put it there.
- Take a copy of it.
- Delete it.
- See if your site breaks (this may also remind you of what it’s doing there)
Often freelance web developers will take a copy of the site, leave it lying on the webroot, and forget to delete it. Freelance web developers just want to get paid and your website’s security is not their ongoing concern. Old copies of the site will, in time, contain out-of-date software that will offer a back door into your site. This is one of many reasons why webroot hygiene is so important.
3. Usernames – it’s more than not using “admin”
The second most common WordPress hack is the “brute force attack”. Hackers set up automated software on a trial-and-error basis to generate consecutive guesses of usernames and passwords.
You know NOT to use the WordPress administrator default name of “admin”. You did know that, yes? Good. However, there’s more…
Say your favorite pet is your cat called “Sally” (ahh, sweet) so you use “5ally” as your username, thinking “ha, no one’s gonna guess that”. Remember, hackers run automated software on a variety of compromised machines therefore they don’t even have to pay for the electricity to hack you! This is why brute force attacks are so common.
So don’t use your pet’s name, your football team, your favorite actors or pop stars names as usernames! Don’t use any words or names because they will be guessed by the automated software. Don’t even use your name with a number, like “danbridges56”. I use the Wordfence Security plugin and I can see what admin usernames the bots are trying out. It’s scary.
And, the hackers will reverse engineer your site and try to hack in using your site’s name or your name. I’ve had multiple attempts to hack this site using my name and variations on it.
Once they’ve got the name all they’ve got to crack is the password. Why make it easy for them? Make the username as difficult to crack as the password.
There are many ways to change your WordPress username. The best way to is create another admin user with a different email address, login with the new one, delete the old one and then attribute all the content to the one you just deleted.
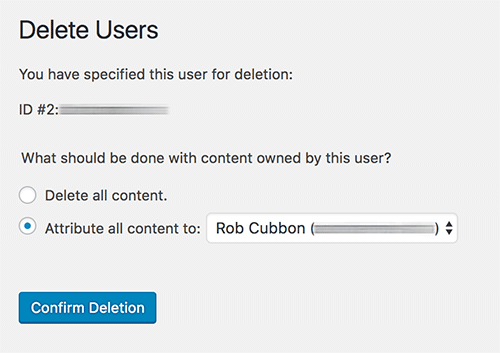
Easier ways to do it: use the plugin Username Changer or you can do this with the security plugin All In One WP Security & Firewall (although Wordfence Security is my preferred security plugin). However, the above manual method of creating a whole new user is a better method of changing a username.
Before changing usernames, please backup your WordPress site.
4. Password hardening – c9Hg!$Csc%Yn^Xf@ – that should do it
It’s amazing that, less than a decade ago, WordPress would set up with the main administrator username of “admin” and the passwords were of five characters of lowercase letters and numbers only. Now, you’re recommended to choose passwords of 16+ characters of upper- and lowercase letters, symbols, and numbers.
This just shows you how much our appreciation of security issues has increased in the last few years. (And, I would say that online security will play increased importance in our lives generally every year into the future. But, I digress.)
Important points about WordPress passwords and passwords generally:
- All passwords, not just WordPress passwords should be 16+ random characters of upper- and lowercase letters, symbols, and numbers. Use a password generator to create them and a password manager like LastPass or 1Password to save them.
- No two passwords should ever be the same.
- Regularly change your passwords
5. WordPress users best practices – create new users and delete them
Regularly change your usernames and passwords.
When allowing other people to access your site’s WordPress administration area, always create a new username and password. Send the details to the person encrypted via a password manager like LastPass or 1Password. Don’t use the WordPress option to email the username to them. And then delete this user when there’s no longer need for that person to access the backend of the site.
Freelance web developers just want to get paid and your website’s security is not their ongoing concern. It’s not that they could be dishonest, but their computers could be compromised and then you’re site is vulnerable. Keep things within your control – create new users and delete them.
6. Wordfence Security Plugin for malware scanning, firewalls, login lockouts and more
OK, time to mention security plugins. I recommend you use Wordfence Security. There are a few good WordPress security plugins but, for me, Wordfence Security is the best. It’ll not only cut down the chances of you getting hacked, but also, if you do get hacked, it’ll help you identify and remove the malware.
However, don’t just activate the plugin, sit back, and forget about it. There are a few important settings you need to set for Wordfence Security and you should never forget about security.
In Wordfence > Options you make sure the automatic scheduled scans are enabled (looking out for malware) and enter your email address so you get alerted about everything (at least initially).
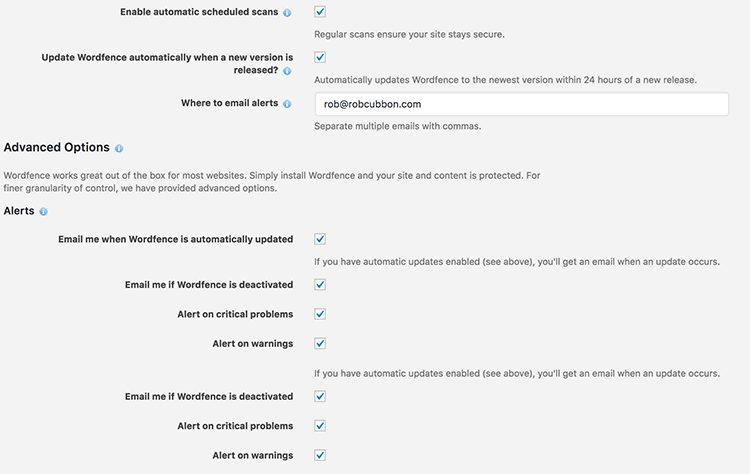
So you’ll receive an email every time someone successfully logs in, if any plugin or theme needs updating, or if the plugin has identified some malware or anything else that needs your attention.
When you first activate the plugin you will be prompted to set up the firewall for “Extended Protection” which may take 24 hours. After which, when you go to Wordfence > Options it should look like this:

At first your firewall will be in “Learning Mode” so it can whitelist your normal website traffic. During this period it’s best not to publish or edit posts to your website. You can enable this “Learning Mode” for another 24 hour period at any time if you’re not sure whether the initial setup was satisfactory.
This process is essential as it’ll make sure your web server will run the Wordfence firewall code before any other PHP code on your website. This makes the Wordfence firewall incredibly fast and can block a malicious request before the WordPress environment is loaded up and connects to the database. This will help the firewall block fake Google crawlers, anyone accessing your site too many times, and anyone generating page not found errors too quickly.
Wordfence also scans you website files for malware, weak passwords, out-of-date themes and plugins, and more. The scan is conducted everyday for regular users (more often for premium users). Head over to Wordfence > Scan to see if the last scan found any problems (you should have received an email if it did).
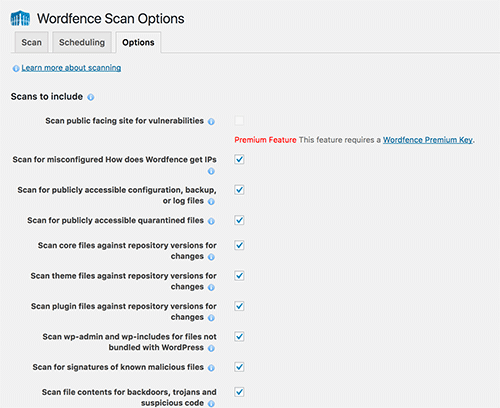
I would opt for Wordfence to scan for everything (check every checkbox) except Enable HIGH SENSITIVITY scanning (may give false positives) and Use low resource scanning (reduces server load by lengthening the scan duration).
In order to tighten up the protection again brute force attacks enter the following Login Security Options:
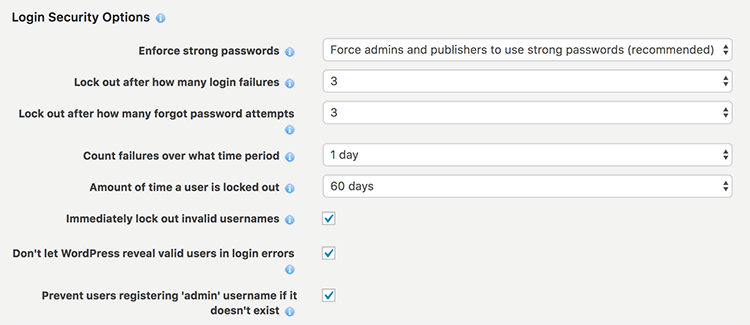
Really, how many times have you mis-typed a username or password? More than three times in a row? Surely not! This is why I’m fairly strict with limiting login attempts.
I love this plugin Wordfence Security! I have the free version on all my WordPress sites and the premium version on this site. Take that, hacker! With the free version of Wordfence there is a 30 day delay of the defence feed updates to their firewall and malware scanning. The premium version ensures your firewall and scanning are bang up-to-date and that you are protected against new threats as soon as they are discovered.
You could also consider using an extra firewall service offered by Sucuri. This will divert all your traffic through the Sucuri servers which would add an extra layer of protection against hackers, bots, brute forcing, and DDoS attacks.
Other services you could consider are Bulletproof Security and Bulletproof Security Pro from AITpro which provide a range of security measures such as proactively searching your website’s logs to make sure all the requests to your server are the ones you want.
7. Backups
Backups, of course, don’t do anything to secure your website. But if you are hacked or have any problems at all with your website, restoring from backup is an excellent “get out of jail free” card.
Take as many backups as you have space for and house them off your server.
In an ideal world, I would take a back up:
- Every hour
- Every day
- Every week
- Every fortnight
- Every month, and keep the monthly backups
However, keeping backups on the cloud, away from your website, requires expensive storage space so, in reality, I only keep daily, weekly and monthly backups.
I would recommend UpdraftPlus WordPress Backup Plugin to schedule backups to Dropbox, Drive or whatever cloud server you care to use. I would also enable backups offered by your host via cPanel or otherwise.
And remember to back up the website’s files and databases.
8. General computer, phone, and online security
You can have the most amazing website security in the world but security is like a chain, it’s only as strong as its weakest link. Similarly, online security should now be a part of your life.
Use VPNs (Virtual Private Networks) to protect the transmission of information when you’re using public wifi. I use Nord VPN (affiliate link).
Protect your computers, tablets and phones with a password so that no one can access your private information if they ever got stolen.
9. Checking file permissions
Check your file permissions. Use an FTP client like Filezilla or go into File Manager in cPanel to inspect all your files and folders (either in the server root or the website root). Control click or right click and change permissions.
What you absolutely do not want are any files or directories set to 777 – that means anyone in the world has access to write and execute the files, so check for that immediately and change it if you find it.
There are a number of variations to these permissions that are more or less restrictive, but the the default permissions (and my personal recommendations) are:
- Folders – 755
- Files – 644
Note: Check with your host before making permissions changes as they can have adverse affects on the performance and availability of your site.
Most of the following tasks are mentioned in this article on Hardening WordPress.
I walk through many of the following processes in this video on security tasks to harden WordPress.
10. Disable directory listing
You must make sure that you don’t list any directories publicly. Unless you disable directory browsing, any random stranger (ie. hacker) will have access to a folder on your site and be able to see the contents of that folder.

If you aren’t sure which folders are listed (if any), get in touch with your host and check whether directory listings are enabled. If they are, the only thing which you need to do is add a single line of code to your .htaccess file. Note: Before making any changes, I recommend you create a backup of your existing .htaccess file.
Log in to your hosting FTP account, and at the root you will find the .htaccess file. If you are using FileZilla or a web based FTP, you may need to enable ‘Show hidden files’ to see your .htaccess file. Open the file, and add the following line of code:
Options -Indexes
That’s it. Now directory browsing is disabled on your WordPress website.
11. Disable error reporting
If a plugin or theme causes an error, the error message may display your server path. This information is useful to hackers, therefore it is better to disable error reporting altogether to prevent security breaches on your website.
You can disable error reporting in WordPress by adding the following code to your wp-config.php file:
error_reporting(0);
@ini_set('display_errors', 0);
If the above code does not work, speak to your web hosting company and ask if they can disable error reporting on your behalf.
12. Protecting wp-admin
The wp-admin directory is the heart of any WordPress website. Therefore, if this part of your site gets breached then the entire site will be compromised.
One possible way to prevent this is to password-protect the wp-admin directory. With such a security measure, the website owner can access the dashboard by submitting two passwords. One protects the login page, and the other the WordPress admin area. If the website users are required to get access to some particular parts of the wp-admin, you may unblock those parts while locking the rest.
You can use the AskApache Password Protect plugin for securing the admin area. It automatically generates a .htpasswd file, encrypts the password and configures the correct security-enhanced file permissions.
Adding server-side password protection (such as BasicAuth) to /wp-admin/ adds a second layer of protection around your blog’s admin area, the login screen, and your files.
13. Protect your login with two-step authentication
There are a few different ways you can protect your Admin login page: as discussed earlier you have to change your username and password regularly, use a strong password, limit user access, and limit login attempts – but this still isn’t enough to stop some brute force attacks.
Two-step authentication (sometimes referred to as two-factor authentication) is showing up all over the Internet. There are many ways two-step authentication can work: you can use fingerprints, retina scanning, voice recognition in addition to the password method of entry. The most common second step or two-step authentication online today is to send a PIN code to a phone.
You can also use a free Google Authenticator plugin. Simply install the plugin and click into a user account. You can then setup two factor authentication by creating a new secret key or by simply scanning the QR code. Then make sure to mark it “Active.”
I personally haven’t done this but you can try WordPress 2-step verification plugin to set this up and let me know what you think.
14. Hide or rename default /wp-admin WP login page
Hackers and bots know the default URL for accessing WordPress websites is the site’s main URL followed by wp-login.php or wp-admin. Changing the default URL and effectively moving the location of your login files makes it very difficult for them to perform a brute force attack.
There are good plugin solutions available that allow you to do this easily:
- Rename wp-login.php – A multisite friendly plugin that allows you to change your login page. Once activated, the wp-admin directory and wp-login.php page will be inaccessible.
- Hide Login+ – Allows you to change name of your login page, admin area, logout page, and forgotten password page.
- Lockdown WP Admin – Another useful plugin that can conceal your admin area and login page.
If you’re worried about forgetting the new location of your login page and admin area, don’t be. You can reset everything by renaming the plugin folder contained within /wp-content/plugins/, which deactivates it. Alternatively, you could delete the plugin and reinstall it once you have logged back in to your website.
Example https://premium.wpmudev.org/blog/wp-content/uploads/2014/07/hide-login.jpg
14. Harden MySQL table prefix
WordPress applies a table prefix to all database tables. The default table prefix is wp_. For example, wp_posts, wp_terms etc. Changing the table prefix can help prevent SQL injection vulnerabilities as hackers will need to guess the prefix; which, in turn, will stop people from gaining control of your database.
You will find the table prefix in your wp-config.php file:
$table_prefix = 'wp_';
Simply change the table prefix to something obscure that no person or script could guess. For example:
$table_prefix = 'asf894dn_';
Changing the table prefix in your wp-config.php file will not automatically change the prefix of your WordPress tables if you have already installed WordPress. Therefore, if you are changing the table prefix on an existing website, you need to update your database too.
One of the quickest ways of doing this is to install the plugin iThemes Security or All In One WP Security & Firewall, which can automatically do all the necessary changes for you.
It is possible to do this manually, but it’s more time consuming. In some cases it may be necessary if you cannot do it automatically via a security plugin.
There are two methods available to you through PHPMyAdmin (the process will be almost identical with other database managers). The first method is to use an SQL query to rename each table. Below is an example of how this is done:
RENAME table 'wp_links' TO 'newprefix_links';Obviously, you would change the reference to newprefix in the above example to the prefix you have defined in wp-config.php.
You need to run the above query for each database table including all core tables and any additional tables added by plugins.
Next, you need to update the references to the table prefix in the usermeta and options tables. You can do this using the PHPMyAdmin interface, however it is much quicker to simply use an SQL query.
To update the usermeta table (formerly wp_usermeta), enter the following SQL query through the PHPMyAdmin SQL tab:
UPDATE 'newprefix_usermeta' SET 'meta_key' = REPLACE( 'meta_key', 'wp_', 'newprefix_' )
To update the options table (formerly wp_options), enter the following SQL query through the PHPMyAdmin SQL tab:
UPDATE 'newprefix_options' SET 'option_name' = 'newprefix_user_roles' WHERE 'option_name' = 'wp_user_roles'
Again, in both examples above, be sure to change the references to newprefix to the prefix you have defined in wp-config.php.
To recap, in order to update your WordPress database tables with your new prefix, you need to:
- Rename each WordPress table
- Update the usermeta table
- Update the options table
15. Block scripts in wp-includes
The /wp-includes/ directory contains a lot of important files that are required to run WordPress. There is no need for any visitor to view the contents of this directory. A second layer of protection can be added where scripts are generally not intended to be accessed by any user. One way to do that is to block those scripts using mod_rewrite in the .htaccess file.
Note: to ensure the code below is not overwritten by WordPress, place it outside the ‘# BEGIN WordPress’ and ‘# END WordPress’ tags in the .htaccess file. WordPress can overwrite anything between these tags.
# Block the include-only files.
 <IfModule mod_rewrite.c>
 RewriteEngine On
 RewriteBase /
 RewriteRule ^wp-admin/includes/ - [F,L]
 RewriteRule !^wp-includes/ - [S=3]
 RewriteRule ^wp-includes/[^/]+\.php$ - [F,L]
 RewriteRule ^wp-includes/js/tinymce/langs/.+\.php - [F,L]
 RewriteRule ^wp-includes/theme-compat/ - [F,L]
 </IfModule>
 # BEGIN WordPress
This won’t work well on Multisite, as RewriteRule ^wp-includes/[^/]+\.php$ – [F,L] would prevent the ms-files.php file from generating images. Omitting that line will allow the code to work. Remember to save a copy of your .htaccess first.
16. Prevent PHP execution in wp-content/uploads
The uploads directory is the one directory that will always need to be writable by the web server. It’s where all files are uploaded remotely. You want to prevent PHP execution in this directory, you can do this by placing an .htaccess at the root of /UPLOADS using:
# Kill PHP Execution
 <Files *.php>
 deny from all
 </Files>
Note: This can break your theme if it requires PHP execution in UPLOADS. If you apply it and the site breaks, remove it and the site will reappear.
17. Deny access to wp-config.php
The wp-config.php is an important file as it contains your database connection settings, table prefix, security keys, and other sensitive information.
If you use a server with .htaccess, you can put the following code in that file (at the very top) to deny access to anyone searching for it:
<files wp-config.php>
 order allow,deny
 deny from all
 </files>
Remember to save a copy of your .htaccess file before editing.
18. Disable file editing within the WordPress dashboard
The WordPress plugin and theme editor allows authorised users to modify your theme and your installed plugins. If a hacker was able to gain access to your WordPress admin area, they could crash your website in a matter of seconds by simply changing or removing the code. To avoid this occurring, you can disable the plugin and theme editor by adding the following two lines to the end of your wp-config.php file:
## Disable Editing in Dashboard
define('DISALLOW_FILE_EDIT', true);
You can also remove the option of updating and installing plugins and themes by adding the code below to your wp-config.php file. Doing this would stop an unauthorized party from being able to upload their own plugin to your website.
define( 'DISALLOW_FILE_MODS', true );
The above code will also deactivate the plugin and theme editor if it is added to your wp-config.php file.
19. Check which versions of PHP and MySQL your host is using
To keep your WordPress site running smooth and secure, you need to have the proper versions of PHP and MySQL. Look for a hosting company that places an emphasis on security. One that has support for the latest versions of PHP and MySQL.
If you have little knowledge about PHP and programming, WordPress gives you the ability to check your PHP version with plugins. Only thing required is that you must have WordPress installed on your server. For example, Display PHP Version is a simple plugin that displays your current PHP version in the dashboard widget, and Health Check is a functional plugin to check the PHP and MySQL versions of your server, making sure they are recent enough to meet the minimum requirements of your version of WordPress.
20. Install an SSL Certificate and get that green padlock
Google has started giving a ranking boost to sites that have SSL/HTTPS security. SSL stands for Secure Sockets Layer, a global standard security technology that enables encrypted communication between a web browser and a web server.
The video above shows you how to get the green padlock once you have the SSL Certificate installed on your site.
While this is a good thing to do anyway, encrypted communications between your site and the visitor can impede hackers sniffing around your traffic as well as “man in the middle” attacks.
21. Use SFTP when accessing your site’s files and folders
When you are editing your theme files on your site, for example, the information is liable to be snooped on in transit. If you connect to your site via SFTP, rather than plain old FTP, then the information is encrypted and therefore unreadable to the snoopers in the middle.
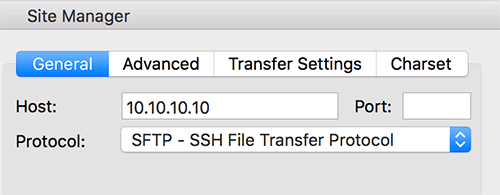
For the same reason you can also access your site via Shell if you are comfortable with command lines (I’m not). Another option is to check whether the File Manager in cPanel or equivalent has the green SSL HTTPS padlock whilst accessing on Chrome. If not, then the connection is not secure and therefore information can be read whilst in transit.
You can do it!
Woohoo, you made it to the end! You are awarded 100 WordPress security kudos points.
All joking aside, I believe online security is going to be a bigger thing in our lives going forward. Remember security is not an absolute. Good security practices are ongoing and continuously improved.
Here is my new course on WordPress security showing you step-by-step how to complete the above tasks.
Many thanks to security expert Chris Varnom of WPsaracen for his help with this article.

A very good informatory article. Can I share the Article to my site. Please give permission.
Hello Rajesh, you can post a link to the article, if that’s what you mean you don’t have to ask permission to do that.
Boom!!!
Awesome article mate.
This is exactly what everyone should be doing with their WordPress sites.
thanks for your help, Chris
some very useful information here, some of which I will take care of on my own sites. thank you.
i also want to add that i wouldn’t recommend using such a long prefix. the maximum table name length is 64 characters and some default names are already quite long. i have encountered problems with this. i would also not recommend changing the prefix at all, as it doesn’t really add security in an sql injection. its 3 lines of code to get the prefix and when you migrate databases you might run into issues.
Thanks Max, good point about the table name length. I have changed my suggestion of the prefix to only a few characters. This is one of the recommendations that isn’t too important. It still is recommended by many WordPress security experts although I have to confess I don’t know personally whether it makes SQL injections harder. It looks as though it should do but I’m sure I could be wrong.
Hey Rob,
Awesome article with tons of excellent tips to secure your WordPress site. While I’ve been fortunate to never have to deal with being hacked (hopefully, it stays that way.)
I’ve dealt with clients who have gotten hacked. They were hosting their domain on GoDaddy and the site was bad. It was the worst I’ve ever seen.
Since then, I have taken the time to take security seriously. I already do most of what you mention in the article. I’ve also got certain things I put in my .htaccess file each and every time.
I have to admit, I’m not using the Wordfence plugin. I guess I need to get it installed on my blog. The last thing I want to deal with is getting hacked.
I love the Updraft Plugin, however, recently switched to BlogVault because I wanted to remove some of the plugins that my site was using.
I’m off to install the WordFence security plugin for my site. I’ll bookmark this site so I can refer back to your recommended settings for the plugin.
Good luck with your new course!
Thanks for sharing these tips, have a great day 🙂
Susan
Have a play around with Wordfence and see what you think, Susan. On the downside it may slow your site down and little bit. But I’m really impressed with the malware scanning, firewall, admin login blocking, and the useful and interesting stats it comes up with.
Thank You. I’ve seen some of these work-rounds individually before but not all together in one post. I feel more confident making the changes now without worrying about one conflicting with another. I’m not keen on adding yet more plugins so altering configuration files suits me best.
I do use the Limit Login Attempts plugin and the huge number of attempts is worrying. I’ve recently used the Updraft Migrator plugin to move a few sites over to another server and that worked smoothly and easily.
I used to use Limit Login Attempts but got rid of it in favor of Wordfence which does that and much more. yes, all of this security work is playing off security against speed. My friend, Chris Varnom, uses three security plugins to lock his site down to the max! At the end of the day it’s up to us as individuals to weigh up the risks. Other people will prefer just Limit Login Attempts, others just Wordfence, and you could use both. There’s no right and wrong! Thank you for your comment, Sue, and I hope you continue to gain value from my site.
If I’m using a MacBook Air do I still need to be careful about hacking.
Yes!
Dude, Your blog is Vulnerable by Brute force attack. Visit /xmlrpc.php . This is no Vulnerability add following code to your htacess file
# Block WordPress xmlrpc.php requests
order deny,allow
deny from all
allow from 123.123.123.123
Search on internet for more info
It says on the Wordfence blog that brute forcing xmlrpc.php attacks “are completely ineffective if you’re using Wordfence because we simply block the attacker after they reach the login attempt limit”.
However, it may be possible for attackers to leverage the system.multicall method to attempt to guess hundreds of passwords within just one HTTP request on xmlrpc.php. In which case, the limit to login attempts may not be as effective. But it’s still highly unlikely the attacker will gain entry even with these hundreds of guesses each time. If you have set up your usernames and passwords, and set up Wordfence as I recommend.
I wouldn’t recommend users to block access to xmlrpc.php in the .htaccess as they may use Jetpack or something like that that uses xmlrpc.php
Anyhow, I also recommend two-factor login so they won’t even get that far.
VERY CAPABLE REVIEW
This review of WordPress security tips ranks well above the quality of the typical security analysis. Providing 100 tips is guaranteed to plug some vulnerabilities in every WordPress site.
The article brings extra value in its implied first-hand user experience (aka “lessons from the trenches”). Frankly, I would rather learn from somebody who has actual experience with a hack attempt– successful or unsuccessful– than somebody with “cookie cutter” notions of what works, and what is important. The computer publications industry is jammed with those.
Most important, a user-to-user approach like this blog and forum actually fosters a sense of community, which is an asset in computer security. A watchful community sounds an alarm about a new threat at least as well as even the most advanced software.
Hello BG, thank you so much for your comment and your support. Very good point about how fostering a community is also good for security, as well as good for your business in so many other ways.
This is awesome and very in depth. I use Wordfence and Vaultpress. I have been very happy with both of them. I am not thrilled with having my log in on my home page and have wondered how to move it…
Thank you so much! I have to confess I haven’t quite worked out about moving the login page. However, I think that 2-factor authentication negates the need to do this.
Very thorough article, Rob. Expanding on your 4th point, a great method for memorising seemingly random passwords is to use a method like this:
Take a couple of lines from your favourite song (e.g. Iron Maiden – 2 Minutes to Midnight); “Don’t you pray for my soul anymore? 2 minutes to midnight,” and take the first letters of the words and change any words to numbers to create something like this – “Dyp4msa?2m2m”.
Then depending on the site, you are registering to (e.g. Twitter.com), add to the end. So you end up with “Dyp4msa?2m2m_twitterdotcom”. Looks totally random, but easy to remember if you forget.
Great, Craig, I love these methods to remember good and long passwords. Gotta say though that didn’t even know 2 Minutes to Midnight, but I remember something about 666. I saw this interview with Edward Snowden on passwords on YouTube where he suggests shift your thinking from “passwords” to “passphrases” and suggested something like “MargaretThatcheris110%sexy!” Although I prefer “Dyp4msa?2m2m”. Although we can’t use either now lol!
Very Useful article.And right away going to implement on my site 🙂
After long time I read an in details post on WordPress security. You pointed some really important part, though no one can say that his or her site is 100% secured. Thanks for the good post Rob.
“no one can say that his or her site is 100% secured” – 100% True! But we can try to make our online world as secure as we can! Thank you for your comment, Shameem.
Hi Rob, i am using cloudflare on my site, is it safe for me or should i install other plugin?
I’m assuming your Cloudflare plugin is to enable the Cloudflare CDN? If so, that doesn’t really have anything much to do with security. It neither helps or hinders it as far as I know. So the content of this article would be as relevant to you as anyone else.
Hey Rob,
Indeed a great list of common WordPress security mistakes.
A couple of days back I faced a situation where there was some unwanted ads being displayed on my blog and that was something I did not install. When inspected I found that there was a lot of unwanted codes that were injected into the WordPress theme files and other main files.
On further inspection I found out the following 3 things which were the reasons for this:
1). Not updating the other WordPress installation, plugins and themes that are being run from the same hosting account if you are using a shared hosting
.
2). Optimizepress 1.0 is known to have a security issue and they have released an update to it. This doesn’t update in the normal updates from your wordpress dashboard. You might want to update it manually, if you haven’t done it yet.
3). Not Cleaning and optimizing your database periodically
4). Leaving the default themes like twentyeleven etc. as it is and not updating them. This primarily happens if you are using a different theme and these default themes just remain there.
5). Not uninstalling plugins that haven’t been updated for a long time by its creators.
These are prone to attacks. A couple of solutions that I found was installing plugin like Wordfence or, Bullet Proof Security or, Better WP security.
Hello Shivam, thank you so much for your detailed comment that will undoubtedly help the people who read it. I’m sorry you had that experience because I know how annoying and upsetting it can be when you find your site has been hacked. The 5 reasons you give are very familiar to me. Very similar to my story.
Very familiar.
Almost exactly what happened to me.
Hopefully someone’s gonna read this and it’s gonna help them!
Very useful article, going to use some things on my website 🙂 .