Creating an email list is one of the most important internet marketing tasks any small business can employ. Subscribers to an email list are more likely to respond to offers and make purchases than visitors to a site. Moreover, nothing cements allegiance to a brand better than a regular newsletter delivered to someone’s personal inbox.

Even though I have written about creating a list and sign-up form in Aweber before, I have made some much better videos about it recently so I thought I’d share this important process again from beginning to end.
Of course, you don’t have to use Aweber. MailChimp and iContact are also great email service providers. The challenge is always to get their forms on your website in a seamless and branded way.
I’m doing videos in ScreenFlow these days instead of iShowU – thanks, Tara! – and as a result they are all in HD. So if anything is unclear in the videos, simply click on the Change Quality cog in the bottom right of the video and watch it in super-sharp high def!
How to create an email list and a sidebar sign-up form
In the first video I show how to create a list with a free incentive (in this case a free e-book and MP3) by:
- creating an email address in cPanel
- creating the four pages you need to create a list in Aweber
- creating a list in Aweber
- setting up a form in Aweber
- putting that form on your website and styling it with CSS so it looks how you want it to
Quite a lot! But the good news is it doesn’t take 10 minutes.
The four pages I create on a site first in order to These four pages are by no means essential to create but it does give your subscriber a more seamless and branded experience.
- A squeeze page
- A thank you page
- A success page
- An “already subscribed” page “whoa there, tiger!”
If you don’t create these pages your subscribers will see Aweber branded generic pages instead – apart from the squeeze page, of course.
A squeeze page is a page where you really sell your free offer and try to get the most sign-ups you can. For example, here is the squeeze page for the subscription list on this site. Once the visitor enters an email address and hits “Submit” they are taken to the thank you page where they are told they still have to confirm their email address by clicking on a link in an email they’ve been sent. The already subscribed page is for those who have submitted an email address that is already on the list.
You then set up a new list in Aweber and create a new form for that list (see in the above video).
In order to create a sidebar sign-up form I get the most basic HTML I can from Aweber and paste it into a text widget in the sidebar. Of course, I’m using the Genesis theme on WordPress which has widgetized sidebars, but if you don’t have widgets you’d paste it into the sidebar.php of your theme.
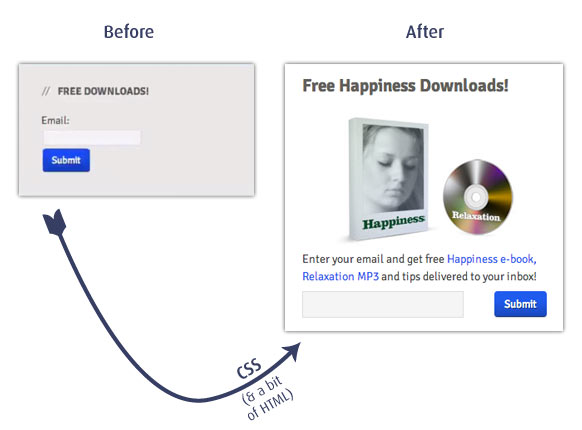
Styling up the sidebar form with CSS
Now comes the fun part – getting the form to look how you want it to!
In this video I show how you style up one sidebar widget without effecting the style of the rest of the sidebar. If HTML is marked up properly (as it always is with Genesis), you can use CSS (Cascading Style Sheets) to style up every individual element on a website or style up similar elements on a website (such as all the input buttons). Hence the “Cascading”.
So, this sidebar sign-up form pasted in as a text widget initially looks the same as all the other similar elements on the sidebar. They have the same background, the same padding and margin, the same type of heading, etc. I use Developer Tools in Chrome to identify the particular widget and see how to change the look of it. More about styling sidebar widgets here.
In Genesis, all widgets (and all elements) have unique identifiers in the HTML. In the example in the video, the text widget’s identifier <div id = "text-4"> this means if you add #text-4 to style up elements in the CSS, it’ll effect this particular widget and not all the others. CSS can be a nightmare to understand but if you keep at it and make mistakes, you’ll learn it!
Also, you can change the text of the form and add an image by changing the HTML within the text widget.
Adding other forms to the squeeze page
HTML from Aweber (or whatever email service provider you’re using) can be placed in the body of any WordPress page.
If you want to create other forms, you could just paste the same HTML from the sidebar text widget into a page. But I would go back to Aweber and go through the process of creating a new form first and grabbing new HTML. This way you’ll be able to track which forms work best on your website by seeing how many sign ups you get on each.
In the above video I show you how to do this. After I paste the HTML into the WordPress page, the first thing I do is to wrap it in a containing div.
<div class="signup-form">
paste in the sign up form HTML from Aweber here
</div>
This is, again, so that I can isolate this particular form in the CSS. It does the same thing as <div id = "text-4"> does in the earlier text widget example. The div class="signup-form" in the HTML is identified as .signup-form in the CSS; the div id="text-4" in the HTML is identified as #text-4. So dots for classes; hashes for ids. What’s the difference between a class and an id? The id should be used once on a page; classes can be used many times.
You can do it!
So on these videos it only takes me a few minutes to start capturing my prospects email addresses – one of the most desired tasks on the internet!
There are many ways to do it. You could use different email service providers – Aweber, MailChimp, iContact, for example. You can use their forms and their generic thank you pages, etc. But this is the way that suits me as I like to have control over the way things look on a website. And, it’s quick and painless!
What do you think? How do you put email capture forms on your website? Or, if you haven’t done this already, does this help you?

Hey Rob just wanted to let you know how helpful I’ve found these posts have been on styling the email forms. Your technique of uploading an image into a post and copying the url from there was so simple and a real time saver! This came at the right time as I was doing some research on landing pages and wanted an email form placed in a prominent place and your tuts really help me make a very nice landing page for our local chamber of commerce.
Keep up the tuts! I love them!
Hey Craig. Glad you’ve found this helpful. I used to spend time uploading an image with an FTP client and then write the HTML while trying to remember where I’d put it. Until suddenly I thought, wait a minute! 😉 More tuts to come, hopefully!