If you spend anytime designing, you’ll know that a Photoshop cut out shape or image is more interesting than a square or rectangular image. Have a look at the two flowers below, which one makes the most impact?

Cut outs look great. Just do a Google image search for “product” and you’ll see that the advertising industry has cottoned on to this.
So, how do we create these photoshop cutouts and get rid of backgrounds? In this video above I give you two ways (although there are many more): an easy way and a hard way.
Photoshop Cut Out Shape with the Magic Wand tool (W)
The Magic Wand in Photoshop selects a consistently colored area without having to trace an outline. There are a number of tools that do the same thing like the Background Eraser Tool as well as the Magnetic Lasso Tool but I find the Magic Wand better.
In order to control which pixels the Magic Wand selects you change the Tolerance. A Tolerance of zero selects only the most identical pixels to where you have clicked (likely to be a very small part of the image); a higher number for the Tolerance selects parts of the image that are less and less similar to the pixel you clicked on; and a Tolerance of the maximum 255 selects all pixels that are completely different to the pixel you clicked on (the whole image!)
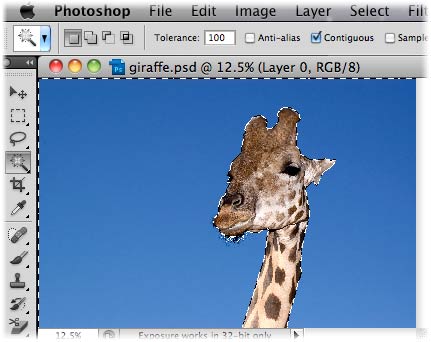
In the case of the above image a Tolerance of 100 was sufficient to select the sky.
Once the background is selected is can be deleted. Or in order to select the giraffe and not the sky or vice versa, inverse the selection (Select > Inverse: Cmd/Ctrl-Shift-I).
You may want to Feather the selection at this point (Select > Modify > Feather… Feature Radius of 1 or 2) which will blur the edges of the cut-out sightly.
Photoshop Cut Out Shape with the Path tool (P)
Unfortunately, not all images, like our friend the giraffe above, are as easy to cut out. Our other example is of a figure with a differing background which is virtually impossible to select by way of some cool Photoshop trick. In this case you just have to trace round the object manually.
The best way to do this is with Paths which are Bézier curves and defined by mathematical equations (named after Pierre Bézier, mathematician and engineer who developed this method of computer drawing while working for Renault). I really could write a lot about how to use Paths in Photoshop, Illustrator and, indeed InDesign but the best way to learn how to trace with Paths is to teach yourself.
Basically, you click once where you want to start and then click on the next point along and drag to get the curve you want. You then carry on if your next curve is going to “follow on” from the last curve, if not, Option/Alt-click on the end of the Path in order to start again with a straight line.

Above you can see (almost) how I traced around the figure and deleted the background. You may get a better idea of how Paths work by watching the video.
Further Advice On Photoshop Cut Out Shapes
One mistake I always see people make with cut-outs is to forget to bump up the contrast. The figure or object you’ve photoshop cutout may have contrasted well against the background originally but now the backgrounds gone it usually needs a bit more.

What you can do
Are you missing out by not putting enough Photoshop cutouts into your designs and websites? I’m always trying to use cut outs as much as possible because they are so much more likely to be clicked on. Try to use cut-out images as thumbnails for blog posts. They look so much better. 🙂

Great advice yet again Rob. In addition to the technique shown on the giraffe, personally, I would use selection > expand (to counteract the ‘feathering’ values). For example, if I used a 2px feather, I would experiment by expanding the sky selection either 1 or 2 pixels so a very slight blue border isn’t left behind. Each image requires different treatments, though.
My favourite method (even though it’s not the fastest) is using the polygon lasso, making a selection and then using feathering and smoothing in combination with layer masks. It’s more complicated than these methods but it gives total control…
Thank you very much, Mr K. Interesting, I’ll have to look into Expand next time. I’m not a huge fan of the lasso – I never did like cowboy movies. 😉
I’ve used a number of different ways to remove backgrounds. I tend to prefer the pen tool. And don’t you hate outlining things with hair?!? Even the giraffe’s whiskers – I’m such a perfectionista that I’d probably never be happy with how stuff like that comes out!
@Louise Myers,
Works even for the pickiest people!!
Kindest Regards,
B@GFX
Thanks for the link, Brian.
Hair is a big problem, Louise. However, if the background is consistent and, in a perfect world, white, the Magic Wand will do a pretty good job. Sometimes you can even copy a channel and work on that.
Great information… I would also like to include that when cutting out stuff in Photoshop, make sure you do it neatly, as sharp and neat items tend to look more professional, and people trust professional more than just a cutout stuff that floats around on the page.
Absolutely, Vic.
Very useful information for me. Nice pictures also. Thank you so much.
Thank you, Manish.
The magic wand tool works magically, I have used it too. You shared a very Informative Blog, Thanks for sharing.
Thanks, Jason
Hey Rob ::
Working with the Pen tool to outline, I find it’s fastest to place Anchor Points on the inner- and outermost extremities of whatever shape I am outlining.
I go all around the shape to rough in the points.
Then I use the “Add Anchor Point” tool and make another pass along the path, putting anchor points between the initial points and clicking to drag the proper curves in place between them.
It works really well.
Cheers for now,
Trish Barnes
Hi Trish, where to add Anchor Points – that eternal question. I know what you mean by the “inner- and outermost extremities”. So with a flower’s petals the Anchor Point will go on the tip of the petal and the trough in between two petals.
I like the Add and Delete Anchor Point tools as well. Just a quick + and – to select the tools as well!
Good to know we’re all fans of the Pen tool.
Thanks Rob! I needed to cut out an irregular image from it’s white background, and despite reading loads of websites, yours was the only one I found clear enough to follow. Using the Magic Wand, Inverse and CMD+J I had the cut out I needed in less than 1 minute! Thanks again.
That’s good to know, Matt. You sometimes have to feather the selection after the Inverse so that the edges are blurred slightly.
Thanks for the comment. 🙂