Any sort of WordPress development – testing themes and plugins, creating themes and plugins, etc. – can be done on your own computer. Why would you want to do this? You’ll find the process much quicker and it’ll stop you going crazy waiting for files to upload to the server.

Getting WordPress installed on your own computer, as if your computer was a webhost’s server, is easy on a Mac with MAMP. If you are on a Windows PC you can use XAMPP.
Setting up MAMP and installing WordPress
The following video shows you how to install WordPress on your Mac using MAMP. This can be done in 5 minutes.
First of all you should download and set up MAMP. MAMP is a acronym that stands for the stack of software it uses:
- M is for Mac OS X, your operating system
- A is for Apache, the web server
- M is for MySQL the database management system (or database server)
- P is for PHP (or Perl or Python) the programming languages used for web development
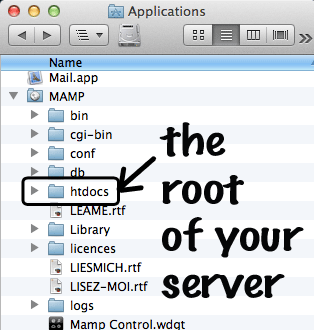
Now that you have all this MAMP goodness installed on your machine, everything that you put in the folder Applications/MAMP/htdocs/ ends up on your localhost “website” which you can access through a browser at http://localhost:8888.

Next you should download the most recent version of WordPress (how many times have we all done that?) After unzipping, place the /wordpress/ folder inside your /htdocs/ folder.
Now you need to create a database:

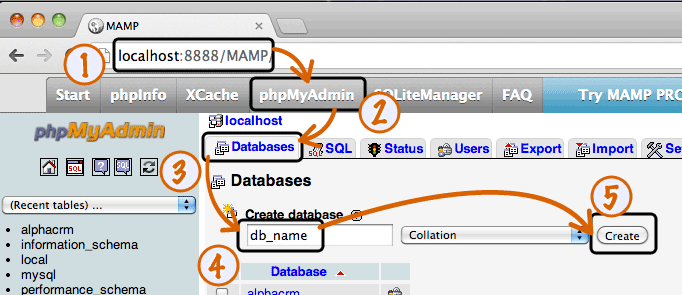
- Go to http://localhost:8888/MAMP/
- Click the PHPMyAdmin tab along the top
- Click Databases in the second line of tabs in blue
- Type a name for your database (no spaces or special characters) and remember it
- Click Create
Having created the database you are nearly ready to install WordPress! Go to http://localhost:8888/wordpress in your browser.
With any luck, you’ll be greeted with a screen saying, “There doesn’t seem to be a wp-config.php file. I need this before we can get started. Need more help? We got it. You can create a wp-config.php file through a web interface, but this doesn’t work for all server setups. The safest way is to manually create the file.” Ignore it and click “Create a Configuration File”.
You’ll then see a screen checking that you have the 5 bits of info you’ll need to configure WordPress. You have them. Click “Let’s Go!”.

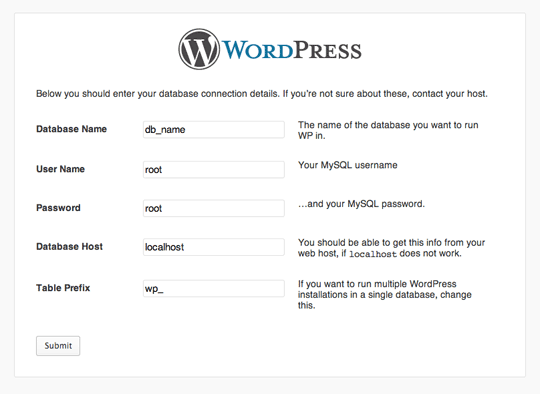
As you can see above you only need to change the top 3 fields to connect to your database:
- Your database name (the one you created in PHPMyAdmin and you remembered it, right?)
- A username. Use “root”.
- A password. Use “root”.
The remaining two you can leave as “localhost” and “wp_”.
Click “Submit”. You’ll then be taken to another screen and referred to as “Sparky”. Click “Run the Install”.

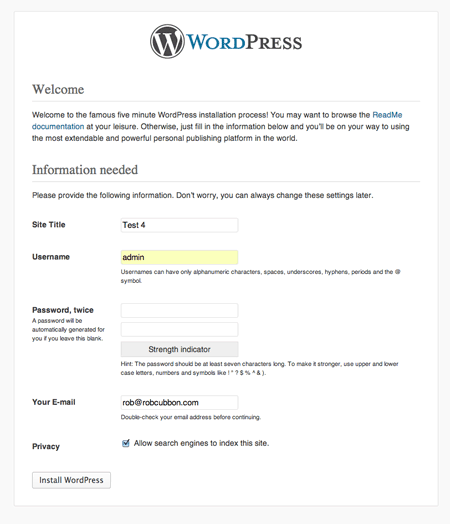
Finally, you’ll be presented with a screen where you can enter the name of the site, the username and password, etc. Then, click “Install WordPress” and you’re done. You’ll be taken to the WordPress administration dashboard at http://localhost:8888/wordpress/wp-admin. Phew!
Installing multiple versions of WordPress on your Mac
This process can be repeated again and again.
The above video shows you how to install another WordPress site on your localhost so you can have multiple WordPress installs to play around with.
All you have to do is to create another database using PHPMyAdmin, download WordPress and run through the above installing process again.
You can do it
If you create multiple WordPress sites both for your clients and yourself, it’s really essential to develop locally first before you create the site on a web host. Having multiple local WordPress installs will speed up your development time.

keep posting stuff like these, i am a regular reader of your site, and i really like your posts.
I rish, good to see you here again. Yes, I will keep it coming. 🙂
Great post Rob. I was just researching local development options just two days ago. I develop most websites in a sub folder live online and in the browser. But I sometimes get in a rapid fire mode of sorts where having a local dev environment would be a big time saver.
I’d go for a local dev set up, Herb. Once you’ve set it up you’ll find it so useful that you’ll keep using it. Yes, it’s a great time saver.
I invested in MAMP Pro a while back, and would wholeheartedly agree that local development is the way to go, it’s so much faster and easier than working online or on a staging server.
The advantage of MAMP Pro is that I can create cool little “virtual domain names” like http://craig.dev and run multiple sites or WP installs really easily. MAMP Pro, Coda & LiveReload and I’m set 🙂
Wow, that’s a pro set-up you’ve got there. Thanks for sharing about MAMP Pro. I’ve got to admit I’d never even heard of LiveReload but after checking it out I can totally see it’s usefulness. For writing code I like Sublime Text 2 and I still use Dreamweaver for editing other people’s code.
I could really geek-out with a blog post on designers’ development set-ups here! 😉
That would definitely interest me, it would be interesting to see how other designers & developers are set up. 🙂
🙂
Rob, it awesome how you can present this information! You could not believe how many blogs I have visited, and what I’ve done with all settings to manage multiple sites on local server, but nothing worked right and were so complicated. Yesterday I delited everything and started over again by following your instructions in this post. And voila! In 15 minutes and I have 2 sites here on my local server. Thank you very much, you have a great talant for tearching. Love is definitely much easier then we’ve been shown!!!!
Great. I’m glad it helped, Oksana 🙂
Hi, Rob. Thanks for the interesting article. I have tried this technique using AMPPS rather than MAMP as it does a similar thing and used it for quite a while. AMPPS is very easy to set up and maintain.
Now though, I prefer to create a reference domain in my resellers dashboard and create new websites directly on their servers. I don’t really miss the speed of developing the sites on my LAN. The really great thing about doing it that way is this – I don’t arrange the domain name transfer until the site is ready to go live and when it does finally get transferred the new (referenced) hosting automatically goes live with the new website. So no need to migrate. Magic!
That’s great, Garry, I create a “dev” subdomain or site often for my clients to show the new websites. It’s great, as you say, because once you get the go-ahead it’s just like flicking a switch to go live.