In my last post and video I explained how to make a child theme for the Genesis theme framework in WordPress. In this article I explain how to start styling the Genesis child theme.
Here you can see where we left off last time with the Genesis child theme only just set up plus an image of the Photoshop visual I used to show the client how the home page would look:
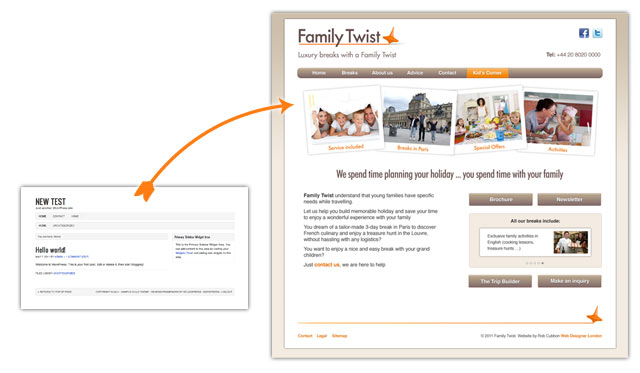
Once the client was happy with the PSD visual, I started creating the child theme locally using MAMP, Photoshop and a text editor.
As you can see above left, the default Genesis child theme looks particularly uninspiring but it is actually very quick to style up the new theme using Genesis. I have made around 10 videos of 5 minutes each showing how I did this, so it can be done in less than an hour!
Genesis Theme Settings
If you look again at the Genesis default theme above (kinda ugly, eh?) you see 3 gray bars across the top. All we need is one top horizontal navigation menu – which is sort of standard these days.
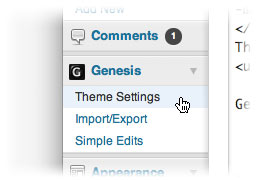
We can get rid of the other two straightaway by going into Genesis Theme Settings on the left hand side of the WordPress administration area.
I will run down the basics of the Theme Settings from the top to the bottom.
- Firstly, I have the default Enable Automatic Updates checked. This means you can update Genesis with a mouse click when the updates come out – as with WordPress, you should do this every time an update comes out. This is one of the benefits of using Genesis – it is developed alongside WordPress and so will always work whatever happens to the WordPress core.
- Leave the Custom Feeds section blank.
- Default Layout is a cool Genesis feature where you can put a sidebar on the left or right, have no sidebars or two sidebars in various arrangements. You can change this on a page by page basis (even cooler). For this site I put the sidebar on the right.
- For Header Settings you can either have an image or the text of the site title. I chose “Header Image” for this site.
- In the Navigation Settings you can choose to have only primary navigation which gets rid of one of those ugly gray bars in this particular sample child theme. You can also Enable Fancy Dropdowns which adds a rather nice Suckerfish delay to your dropdown and makes you look like a coder rockstar when you’re not. You can add other options to the navbar such as today’s date or a site search.
- You can choose which pages you want Breadcrumbs on. Breadcrumbs show where the page is located in the website hierarchy. I only tend to keep them turned on for search results and child pages. I turned these off which meant I got rid of that another ugly gray bar.
- You can choose to have Comments and Trackbacks on posts only but not on pages (as is the usual way).
- You can alter the output of your main blog pages by choosing to have excerpts only and thumbnail images, for example, in the Content Archives section.
- In the Blog Page section you can choose to have only certain Categories listed. I left this with All Categories.
- And lastly you can add various scripts to your header and footer sections of the webpages in Header and Footer Scripts. This is useful for installing Google Analytics and jQuery scripts.
I generally like to do as little as possible here in the Theme Settings and as much as possible in the style.css and functions.php files. The Theme Settings, although important, are only very general controls. When you are creating websites for demanding clients. Most of the action takes place in CSS-land.
Adding a background color and image
This is, of course, straightforward CSS. The background is a light brown color with a gradient running down from the top where it is darker. In the video below I copy a slither of the background and then create a one-pixel wide GIF in Photoshop of the gradient and same that in the child theme’s images folder as bg.gif. The CSS to create the background is:
body {background : #f3ece1 url(images/bg.gif) repeat-x; }
This repeats the one-pixel wide GIF along the top of the background and then, under the repeated GIF is a background color of the light brown #f3ece1. This color I sampled with the Photoshop Eyedropper Tool (I) was the color of the last pixel at the bottom of the copied slither from the PSD. This means that the gradient runs down from the top to the background seamlessly.
Adding a background color to the main page wrapper
This actually makes most of the page light brown which isn’t much good, so, in order to get the main core of the page white I added some CSS to a div id in the mark-up that contains all the page elements. In most web page mark up there is a div id called “wrap” or “wrapper”. In Genesis it’s called “wrap”.
#wrap {margin: 15px auto;

background: #fff;

width: 960px;

padding: 20px ;

-moz-box-shadow: 0px 0px 5px #aaa; -khtml-box-shadow: 0px 0px 5px #aaa; -webkit-box-shadow: 0px 0px 5px #aaa; box-shadow: 0px 0px 5px #aaa; }
This CSS above colors the central area white. I’ll go through the above, line by line:
margin: 15px auto;puts 15 pixels on top and bottom and makes sure the whole website is centered – this is from the default Genesis themebackground: #fff;makes it whitewidth: 960px;makes it 960 pixels wide (good job I’m here!)padding: 20px;this adds 20 pixels of white around it so that the background doesn’t butt right up against the edge of the text (so it isn’t 960 pixels wide, it’s actually 1000 pixels wide – CSS will drive you mad!)-moz-box-shadow: 0px 0px 5px #aaa;… etc. adds an even shadow around the wrap inallmost of the main browsers
So that’s the background and the wrap finished, now it’s on to the header logo.
Adding a header logo in Genesis
As you can see above I chose “Header Image” under Header Settings in the Genesis Theme Settings above.
I saved the logo in Photoshop and put it in the child theme images folder and then added this to the CSS:
.header-image #title-area {background : url(images/logo.jpg) no-repeat top left ; }
This adds the logo to the top left of the header which returns us to the home page when clicked.
The logo for this site was deeper than the space allowed so I had to add a greater height to another two elements in the stylesheet.
#header {height: 126px;}

.header-image {height: 126px;}
Genesis themes are excellently coded and the CSS is just a joy to work with, however, this is one of the few cases where you have to add something twice!
Starting to style a Genesis child theme in WordPress
I actually did realise I was filming myself for parts of this video so I apologise for the unkempt appearance. 🙂
Here is the video where I change the Genesis Theme Settings and style the background and logo in WordPress using a Genesis child theme. It also may help you to view the previous video where I create the child theme and the following video where I move on to a header text widget and the top navigation bar.
What do you think?
Hopefully this contained some useful CSS tips for those that don’t use Genesis and was helpful for those that do! I’m always interested to hear about how you create WordPress themes or if you have any questions.

Looking forward to the rest of the series. Great to be able to watch your method.
I’m too lazy to type my CSS so use Stylizer. A bit dangerous as I’ve started to forget how to do it now. I agreed with you about how well laid out the Genesis style-sheets are.
Yes, I use Dreamweaver from time to time – if you’re doing a lot of it you need something like that. You can get a sneak peak at the subsequent videos in the series at my YouTube channel or you can wait for them to come here with the instructions. Glad you’re liking them. 🙂
hi Rob
just noticed your tutorials on wordpress themes and genesis.
Im looking forward to having a look at them as have seen the light and am looking at using wordpress on sites that dont require tons of bespoke coding.
Hey Louie, good to see you back here again. Definitely, WordPress is the way to go with simple sites – it can handle just about anything although, if you’re looking to do a huge shopping cart with 1,000’s of products, it’s not the CMS for that! Let me know if you need any help with it. 🙂
Hey Rob – This is great – just what I was looking for – are yo doing any more posts about styling a Genesis child theme? If so let me know where I can subscribe.
Thanks Sofia, you can subscribe to RSS feed here: http://feeds.feedburner.com/robcubbon/MBQo or my lovely newsletters here: https://robcubbon.com/free-how-to-market-yourself-online-ebook/ Top tip: do both 🙂
Rob,
Thanks for taking the time to put this together! Your efforts are much appreciated.
Robert Donnell
No problem, Robert, there’s plenty of other Genesis stuff here.
Hi Rob
I love this, I am currently looking into creating websites with wordpress (I have already set up my own with it) I just love the ease of wordpress compared to dreamweaver and FTP and how you have to check it constantly.
Anyway I am eager to make sites that are different and have my own spin on it instead of just a custom wordpress theme so these articles are great! I am taking my time as I am not a coder so I especially like how you have put together the tutorials/ videos. I am hoping to find your guide useful. 🙂
Thanks, Sian, if you check out this post it has all the videos I made in this series so it shows you how to go from the PSD design to the finished website using Genesis and WordPress. It’s possible to get the site to look anyway you like and get it to do anything you want it to do!
Thanks Rob
Well, I guess you can make a genesis theme that’s attractive if you’re as talented as you obviously are, but it’s the ugliest framework of them all. The child themes are drab and unbelievably narrow width. They brag about theme control panels but the CPs are almost bereft of options. I’m a civilian. I don’t want to use Dreamweaver, I don’t want to tinker much with the code. I want a great looking site fast — and that’s their sales pitch.
Granted, everybody’s designs are shrinking these days. In the rush to create responsive themes, content space gets sacrificed because it’s easier to get the theme to scale down if it’s narrow to begin with. (btw, I did try eleven40, their widest theme — it’s also the ugliest).
The only good thing about Genesis is that it seems very stable — probably because there are so few bells and whistles it’s less likely to break down.
Hello Amy, thanks for calling me talented (although I’m not) 🙂 I can understand your frustration as Genesis taken straight out of the box is pretty ugly. Yes, there aren’t a huge amount of options in the control panel – I think they keep that down to a minimum, as you say, to keep loading time down and to increase stability.
However, I think at 960 pixels they’re as wide as most themes. Maybe, others are nearer 1000 pixels but I don’t think that makes much difference. I quite like the responsive theme Streamline which redesigns itself to present a different look for mobiles and tablets and I personally quite like eleven40 that you tried and that’s a massive 1140 pixels wide on a desktop browser (ah, just worked out why it’s called eleven40!)
OK, if you don’t like them, you don’t like them, fair enough. I see from your link you’re trying out Generate (the Copyblogger theme) – if you need a hand with anything, drop me a line.
Hi Rob
Thanks for the info, I’m really battling with the image logo for my Genesis child theme, it was working then I wanted to make the logo a little smaller, I deleted the file, put the new file in images then changed the CSS file to reflect the new file and now I get nothing up there? Help Please 😉
Hello Shannon. Sounds like you may have made a mistake with the image name or file path in the CSS? Instead of deleting the old logo why didn’t you just create a new logo with the same file name and over-write it. Do you have a URL?
I use Genesis a lot, and thanks very much for these tutorials. I wanted to say I disagree with Amy up there. I really like eleven40!
Now I know the video currently on this website is far too large (and a bit pointless at the moment), but I’m going to make it smaller and more purposeful when I can, BUT, here is a new site I just launched for local businesses in my area, using eleven40 and people seem to like it. Take a look : http://www.westcountry.co – I think eleven40 is a beautiful theme.
Hey Liz. Yes, I’ll probably re-do this website in eleven40 one day when I get a chance. I absolutely love WestCountry.co! I don’t think the video’s too big. I love the baseline in it! Did you use the FitVids plugin to re-size the video in the smaller devices? The only thing I would have done differently would have been to center the logo in the smaller sizes. But a lovely, beautiful website. Thanks for sharing!
Rob – Thank you very much. Yes – it was ftivids – the jQuery plugin ( http://fitvidsjs.com/ ).
Liz
Yes, I use FitVids. 🙂
Hi Rob, I am currently going through all of your tutorials and have found them extremely helpful. I’m a bit new to Genesis and I have a question that the support forums just don’t seem to like.
I would like to have 3 widget areas in place of the blog and sidebar. Im not sure if this is anything you would be willing to help with, But if you could point me in the right direction I would appreciate it beyond words! I would like it to be just like the 3 footer widgets I have on my main site.
Thanks Rob!!!
Hello Samuel. I’m glad you’re finding the Genesis tutorials helpful. I’m not sure if I completely understand your request though. Do you just need three footer widgets on every page? You can get that by pasting this in your functions.php and the widget areas will appear in Appearance > Widgets.
/** Add support for 3-column footer widgets */
add_theme_support( ‘genesis-footer-widgets’, 3 );
Have a look at the functions.php of the two themes and see if you can work it out by pasting code from one to the other. Keep copies of the originals to upload by FTP in case you make a mistake. I hope this helps.
Thanks its very useful entry for me.. it will help me to style genesis theme.
Glad it was useful, Rohit.
I love your writing style. You know how to explain clear enough to make newbies like me understand. Anyway I got a problem here. I used DreamWeaver CS5.5 to build a child theme. I used @import to import every styles from the parent theme. Till now everything was fine but problem arose when I tried to save all the customization I made. All the codes go to the parent stylesheet. Is there anyway to put codes to the child theme stylesheet?
Thank you, Sharif. I’m glad you like my style! I’d need to see your files to be able to see what’s going on. I like to use that @import method from the parent theme but I usually have all the styles copied into the child themes styles. Maybe you could try that?
Thanks @Rob for taking & writing this article… appreciate your effort.. good to read it 🙂
Thanks, Arafin.
Hey very nice guide. answered lots of my questions . Hope you will continue doing more guides.
Hello Rustan, more here.
Hi Rob!
I’m using genesis fw with prose child theme and I m trying to insert a background image to the whole body area, that is header, menu, body and footer.
Do I have to slice the image in 4 sections and insert the in appropriate css styles that belong to the header(I think its the wrap style, right?), menu, body and footer(I wonder if this will work on different resolutions) or there is another way to achieve this result?
Hello Makis, you should be able to insert a background image onto the body selector. Certainly don’t slice it. Something like this can respond nicely:
body{
background: url(images/bg.jpg);
background-size: cover;
background-repeat: no-repeat;
background-position: 50% 50%;
}
But it depends what effect you’re after.
You have saved my life Rob… Thanks a lot 😀
I just would like to request you, can you also make a post on how to make the circles (that’s at minimum pro) theme?
If you can help in comment section, I’d be very grateful too.
Thanks again Rob.. this post helped me a lot.
Sam – you use the plugin Simple Social Icons. Are you using the new Minimum? In the new Minimum using the plugin is standard. No drawing required. If not we I altered the old Minimum to do this – see example here : http://demo.wpwhoosh.com/brian/
Liz
Thanks a lot Liz for your help 🙂
Yes I was trying it with new minimum pro. As you said, the way It works. I wasn’t able to figure out how to make it circle, but after changing the radius it’s done.
Just one more question, can I change the social icons to other picture?
Hi Sam, can you post the URL of the site you are developing or tell us how you are displaying the social icons? I have a tutorial on this but it involves a bit of HTML and CSS https://robcubbon.com/social-media-buttons-html-css/ I also have the HTML, CSS and image sprite I’ve used for the social media buttons top right of this site.
Hello Rob, I want to show it exactly as it’s on minimum pro theme.. http://demo.studiopress.com/minimum/
But instead of social icons like facebook, twitter. I want to put picture on the circle of me and team. Is it possible?
Thanks for your help my friend.
Hi, Sam. I’m afraid I don’t have the Minimum theme so I’ve no way of knowing how those social icons are created. If you want you could email me with your WP login and I could take a look.
No problem Rob.
Sam – no you can’t change those icons in the plugin without changing the code. I still find the plugin really very useful though as you can change the colours to go with each site you do so easily.
We did modify the plugin code of it to allow for more than one set of simple social icons on a page. No idea if they fixed that in the latest version, but certainly up until recently you couldn’t do it.
Thanks, Liz, for helping Sam out. I’ve no experience with the Minimum theme – although I’ve often thought what a cool theme it looks!
Glad this post helped you, Sam.
I am trying to create a background image for my navigation bar. I have tried so many different ways. Can you help me?
Hi Jessica
Have you seen this:
http://stackoverflow.com/questions/9166238/before-and-after-nav-images
On your example site they are using the :before and :after pseudo-element with the content property.
I think the simplest way would be to do this (below) and add another for the right side.
nav:before
{
content: url(myribbonleft.png);
}
I haven’t used the :before and :after pseudo elements nor the content property before in CSS. So I would have to refer you to the answer from my clever friend David. I would definitely try to do what he suggests plus copying the styles that they have on .navigation-main:before, .navigation-main:after {}. I hope this helps, Jessica.
Thank you guys so much for taking the time to respond. I will try out your suggestions tonight and let y’all know how it goes:) much appreciated
Hi Rob,
Do you know on how to put a wrapper to the header div? as of now my div is outside the wrap class. using some function so relocate it.
I would like it like this:
Hi Jeremi. I’m not sure what you want to do because the HTML that you have pasted has disappeared. You should use PasteBin to show us any code or markup.
Sorry Rob, Here’s the pastebin
http://pastebin.com/4q3SsMJY
Thank you, Jeremi, this is quite difficult to do. Can you tell me what you want to achieve? It will probably be possible to do whatever you want to do without creating an extra wrapper.
Yeah i know, I’m planning to have a full width header wrapper with a black background and inside is the header div with 980 pixels width and margin 0 auto… for now i can only do the header div with 980 pixels width and margin 0 auto. no outside wrapper. Hope you can figure this out! This will help me a lot and maybe you can post a tutorial for it… It will not only Help me but others as well 🙂 Thanks!
Hi Rob, Finally someone was able to answer it. I’m not sure if im allowed to post links here… Just edit it if you want to 🙂
http://wordpress.stackexchange.com/questions/121660/add-an-outside-wrapper-to-my-header-and-make-it-full-width
Thanks for the effort checking it… You are one of a few people i can count with.
Jeremi, thanks so much for posting this fix. I remember trying to do something like this and I wasn’t able to. You sure are allowed to post links here – especially when they are that good 🙂
Big thanks to you my friend, and best of luck with the Genesis project you’re working on.