One of the easiest ways to sell content online is with a membership site using WordPress as a CMS with WishList Member as the membership plugin.

A membership site is where visitors have to register or pay to access information in a password protected area. Paid for content has long been a lucrative revenue model (over 2 billion dollars spent last year on online content in the US), however even if you take away the paying side, a membership site is still a great way to develop a community.
Using WishList Member with WordPress
I spent a couple of weeks researching WordPress membership plugins before I decided to use WishList Member plugin. I purchased the Single Site Licence for $97 and overall I was very happy with the product.
The reasons I chose WishList Member were:
- the documentation videos were laid out simply and setup is straightforward
- there is an active forum for support (I always like a forum because users give better answers about a product than the people who have created it!)
- it is used by David Risley, something of a membership site expert
- they are a well-established company and well-respected within the WordPress community
Set up a membership site in a few minutes with WishList Member plugin
After you’ve purchased the licence from WishList Member they will give you a download link for the plugin. This plugin should then be unzipped and the resulting folder called "wishlist-member" (1.9MB) should be uploaded to the /wp-content/plugins/ folder in your WordPress installation using an FTP client such as Filezilla.
Setting up membership levels
Once you’ve activated the plugin through the Plugins panel of the WordPress administration area the first thing you must do it is to create your membership levels. Further down the line you may want to create different membership levels (bronze, silver, gold membership levels, for example) but let’s say you just want to start with one.
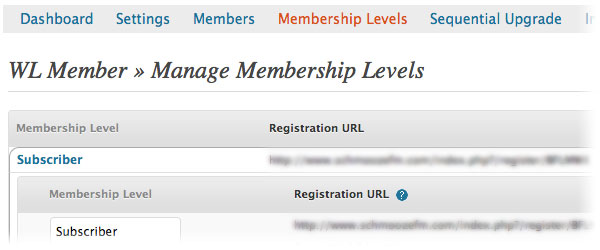
Go to WL Member > Manage Membership Levels > Membership Levels and create a new level, let’s call it “Subscriber”.
Setting up registration/error pages
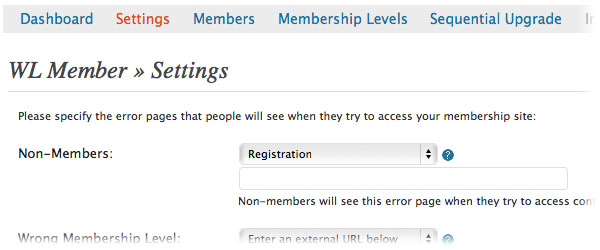
The next thing you must do it is to create your error pages. To do this go to Pages > Add New in the WordPress area. You may also see a new page created called “WishList Member” – ignore this page and do not delete it! I called the new page “Registration” and this is what was written in the text area of the page:
Thank you for your interest. Please register in order to proceed.
[register_Subscriber]
Please click the activation link in our email to receive email updates of our latest deals.
As you can see there is some shortcode in there – [register_Subscriber] puts in a registration form for the “Subscriber” membership level we just set up. This is the page where your visitors sign up so it’s good to also include reasons why registering will be beneficial.
Once you have saved this page set it to become the Non-Member error page in WL Member > Settings > Configuration.
Setting up the sidebar registration form
Now, all membership sites usually have a sidebar element that either tells you that you are signed up (usually with a “Welcome, Username”) or a message that says “You are not logged in”. WishList does this all for you with a widget.
The widget even gives you the option to register and a lost password link. Setting it up is easy, just go to Appearance > Widgets and drag the WishList widget into the area of the site you want it to go and fill it out:

Creating members only content
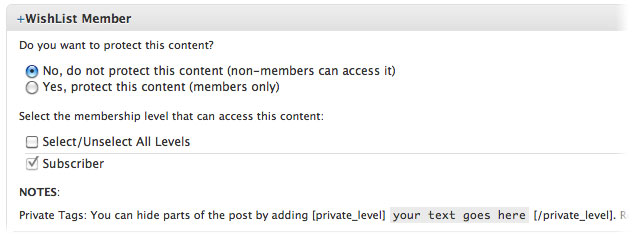
Of course, you’re going to have to create some content that only your members can view, otherwise there’s not much reason to register! There are two main ways you can do this. You either have whole pages or posts that are members only or you can have areas of pages and post that are members only.
If you scroll down whilst editing a page or post in the WordPress administration area, you can click a radio button to protect a whole page or post from a non-member:
If a visitor tries to access a protected page they will be taken to the registration page.
Alternatively you can protect an area of a page, usually the second half, by using shortcode in the WordPress text editor:
Content available for everyone (usually an introduction)
[private_subscriber]
Quality content that you want people to sign up for
[/private_subscriber]
You would need to register as the “Subscriber” membership level as per our example in order to view the content within the shortcode. Visitors will see a “Content protected for subscribers only” message where the protected content is.
Congratulations, you’ve set up a membership site in 5 minutes!
That is it! You have now set up a site with unlimited membership levels, a registration form, a sidebar sign-up form, a lost password link, content protection, secure RSS feeds … there is, however, more you can do. You can get members to pay for the content!
Monetize your membership site
There are many ways to get members to pay for the content with the WishList Member plugin. The most popular is through integration with you PayPal business account.
To do this go to WL Member > Integration > Shopping Cart in the backend and select PayPal from the drop-down menu.
Integrate with MailChimp and AWeber
It is also essential that you get your members onto a MailChimp or AWeber mailing list so that you can easily communicate with your community. This works very well with WishList. You will have to get API keys and other information from the email management service and enter them at the WishList backend. There are excellent tutorials available for AWeber and MailChimp integration.
Once this is set up the registration and email opt-in processes are merged so that members get an activation email on registration which, when clicked, will put members on the MailChimp or AWeber email lists. I was very impressed with the integration with MailChimp.
Creating a membership site
I was delighted to get a chance to set up this frontier market investing membership site as I was interested to see how WishList Member plugin would work. Overall it is a robust and excellently supported plugin.
On the downside, the forms it creates are slightly inflexible. For example I was unable to modify the sidebar sign-up form and main registration form to be anything other than Username / First Name / Last Name / Email / Password – it is not possible to take any of these away.
If you wish to create a free membership site the best way of handling signups through the sidebar, however, is by using the WishList Registration Widget which allows visitors to sign up after only entering two fields – username and email. Their password is then emailed to them. I have tried this out and it works a treat. Coupled with an integration with MailChimp and Aweber this must be one of the best ways to increase registrations and build lists on the web!
Just about every aspect of the membership functionality is incredibly easy to modify with WishList Member plugin. If you want a simple membership site, free or paid, I would recommend this plugin.
Have you ever created a membership site or used WishList Member plugin for WordPress? What are your thoughts?
There are affiliate links in this article. Photo credit.

Great stuff Rob. You’re giving so much advice lately, I can’t keep up!
Thank you very much, Mr K., new avatar, I see.
Yes, gone back to the ‘ol Black and White style!
Hi Rob
great post on setting up Wishlist membership sites, you have given me a solution to my problem which was how to remove the sidebar from the registration pages. Instead add the login widget and thus members can sign up without having to click onto the login page.
I have found that the latest update makes registration forms very customisable, ie, you can limit the inputs to username, first name (renamed to name), email and password (twice). Plus you can add the form multiple times (by copying the form code and pasting it into the footer area of a custom form), ideal if you are creating a long sales/optin page.
thanks for the advice, now to put it into action
igor Griffiths
Thanks for telling me about that. That really is a great improvement they’ve made. Best of luck with your site.
Hello,
I found you instructions very useful and straightforward – thank you.
Question – when I create the membership level it creates a registration page including recaptcha. In the manage membership levels I can click on the URL and the reg page shows up with recaptcha , When I create an error page as you did I used the short code
[register_stage 1]. I do get a reg form but does not look like the one I click on in manage membership levels, and the recaptcha is not there. How can I used exacly what I see when I click on the membership level url reg?
thx,
Mark
Hello Mark, when you create a “default” registration page in Settings > Registration Page > Custom Registration Forms – you can specify if you want a recaptcha or not. In order to drop this particular registration form into a page you paste the short code: [register_level] (where “level” is the membership group you’ve created in Membership Levels > Membership Levels – here you can specify you want a captcha). I only have one membership level and one restration form but maybe you have more?
I’ve maybe not understood your problem sufficiently but this might help.
Thank you,
Excellent article.
Short and sweet.
Thank you, Ruan.
Hi Rob,
Loved your thorough review on Wishlist Member.
My team and I developed a sidebar registration form for free membership level that requires only email and username and has real time validation. It registers the user to the free membership level right after he clicks the “register” button.
This is the link to the plugin: WishlistRegistrationWidget.com
Would love to hear your thoughts regarding the plugin.
Regards,
Bob
Hey Bob, thank you. Looks like a great plugin.
If you compare os commerce, wordpress and magento, of course magento would be more stable and professional… You will need more powerful hosting for magento, but other than that it’s same expenses in future. I saw a private sale solution, developed by Plumrocket company. I think you can find it on their site. Its basically a package of magento extensions and magento private sales theme. You can also extend it with cart reservation, magento invite friends functionality with ability to import address book and magento reward points extension. If you really like Fab.com or Gilt.com you can add some magento social shopping extensions such as live feed plugin, inspiration wall, faves… etc.
Amazing, I am working on it for one of my client and i love the short code stuff you told about registration. So Now i know how to make separate registration pages for each of my membership level.
Can you please tell me how can i do the same thing for login ? I want to make the login form different for each membership level
Thanks
You could make a different login page for different membership levels using PHP conditional code. Is that what you mean, Raheel?
No,
I was looking for something like
[login_goldmember]
[login_silvermember]
basically i have setup dashboard pages for each membership level.
Lets say dashboard-silver-member
So how can i make this that when a user log in to the portal he will be redirected to dashboard page of the membership level to which he belongs to.
I hope it will be more clear to you now.
Regards,
Raheel
Hi Raheel,
There isn’t any login form shortcode for each level, because it doesn’t really matter.
The login shortcode is the same no matter which level the customers are registered to.
When a customer logins to the membership website, he will be redirected to the appropriate after login page that has been setup in the general settings or inside each level.
If you want to redirect your members to different dashboard pages after they login to the site, you can do that by defining the “after login” page for each level in the Wishlist Member settings > “levels”.
If a member is registered to more than one level, he will be redirected to the after login page of the level with the higher rank.
You can set the levels’ order under the levels > advanced settings > level order.
Hope this helps you.
Bob Tolbert
http://wishlistmemberdevelopers.com
Thank you, Bob, for sorting this out for Raheel.
Thank you so much both. Its clear to me know 🙂
Hi,
I have one more question if you can help me in this.
Actually i am making a tutorials site and each subject is actually a different membership level and i have a team of tutors for different subjects.
Now i want that when a customer signs up for a subject then an email should be received by that tutor also so he may know that a new user has signed up for his tutorials.
is this possible ?
Thanks.
Hi Raheel,
It is only possible when developing a plugin that will notify a specific email address when someone is registered to a specific level.
If you are interested in custom development, please send us a quote request using the contact form in our website: http://wishlistmemberdevelopers.com/request-a-quote and we will contact you over the phone to go over all the details.
Best regards,
Bob Tolbert
Thanks Bob,
I’ll give it a try and if i really need custom development i’ll talk to my client to get the approval.
No problem.