Every WordPress site is different. This is because everybody chooses a different theme or “look and feel” for their site. Creating a header and top navigation menu in WordPress will be a slightly different process for each site.
Here I am using the Genesis theme framework for WordPress because I absolutely love it. However, there will be important points in this article that wil help anyone with a WordPress website.
This is part of a series of articles and videos where I create a website from scratch. I first explained how to make a child theme for the Genesis framework and then I wrote about starting to style the theme by adding the background and logo.
Adding Facebook link, Twitter link and other information to the header
Having already added the logo to the top left of our site’s header, we will now add some extra information to the right hand side of our header. In this case we will add Twitter and Facebook links, etc., by way of a widget.
I’ve got to admit I’ve gone a little widget crazy lately, having been a little dismissive of them in the past. What’s a widget? Well, they’re self contained bits of a website that you can drag around and control via an easy-to-use widget area.
One of the many beauties of Genesis is it’s effortless ability to widgetize any area of the website. So:
- If you want a different order of boxes on the sidebar you can do it in seconds.
- If you want a featured post here, 5 latest category headings with thumbnails there on the home page, you can do it in seconds.
- If you want a search bar, social sharing, Twitter feed, calendar, tag cloud, etc., here, there or anywhere, you can do it in seconds.
This intuitive, easy-to-use back-end functionality is particularly useful when creating websites for clients that want the ability to control all areas of a website but lack the skills to do this.
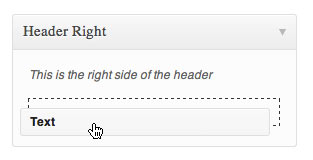
Anyway, in this instance we need to create our own custom widget and we do that by dragging over a Text Widget to the Header Right area in the Appearance > Widgets interface in WordPress.

And in this Text Widget you can put HTML. Here is the HTML I put for this particular site. I just has a Facebook page link, a Twitter link and a phone number.
<div id="connect">

<ul>

<li><a href=""><img src="http://site.com/images/facebook.jpg" style="border:0;" /></a></li>

<li><a href=""><img src="http://site.com/images/twitter.jpg" style="border:0;" /></a></li>

</ul>

<p id="tel"><strong>Tel:</strong> +44 20 xxxx xxxx</p>

</div>
And here is the CSS to style the above:
#connect {float: right;}

#connect ul {float: right;}

#connect ul li {list-style: none; display: inline;}

#connect p#tel {margin-top: 33px; font-size: 18px; color: #66504e;}
Here is what appears on the right hand side of the head as a result:

Video of adding heading info and navigation menu
In this video I show how to add the widget to the header and how to style up the menu in Genesis.
Creating the top navigation menu
Top navigation menus (or “navbars”) used to be the bane of my existence but now, with Genesis and WordPress menus, I have developed a really easy system of creating them which takes seconds as opposed to hours.
Genesis already has in place the ability to have a Primary and Secondary Navigation Menu. For this particular example, I got rid of the Secondary Navigation Menu using the Genesis Theme Settings as the client only wanted one.
In the video above I show how I amend the CSS to get the menu to look like the one in the PSD visual I did.

By using Chrome Developer Tools or the Firebug add-on for Firefox, you can tell which selectors in the HTML are being used in the CSS to style the menu.
#nav {-khtml-border-radius: 6px; -moz-border-radius: 6px; -webkit-border-radius: 6px; border-radius: 6px;

background: #745d5c url(images/nav.gif) repeat-x  ;

border: 1px solid #745d5c;

width: 958px; }
As you can see in the above video, I increased the radius of the rounded corners, added a gradient background and changed the border color of the menu. So now the menu doesn’t look like the boring gray one you get with a vanilla Genesis install.
I also added the following CSS to change the color of the text in the menu to white.
#nav li a {color: #fff; }
There is also the ability to change the style of the current page links, the hover links, the sub-page links and the sub-sub-page links.
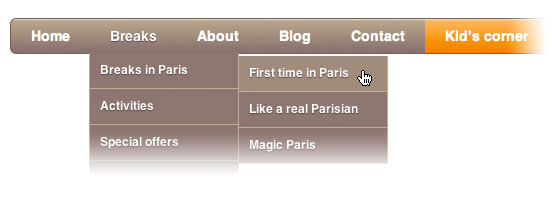
With Genesis, you can easily have drop-down menus for sub-pages (or child pages) and then fly-out links for sub-sub-pages (or grandchild pages). You can have these on both the Primary and Secondary Navigation menus.
Creating pages, child pages and grandchild pages
Here is my video where I add new pages to the WordPress menu so that they appear in the navigation menu as pages, child pages (as drop-downs) and grandchild pages (as flyouts).
You can choose a page to be a child or grandchild page under Parent in the page editor. And when you look at the pages (under Pages > All Pages) the child and grandchild pages are indented underneath their parent. Doing this will also give them a logical URL (for example, www.site.com/music/jazz/charlie-parker where the page “Charlie Parker” is a child of “Jazz” which is a child of “Music”).
Creating a navigation menu with drop-downs and fly-outs
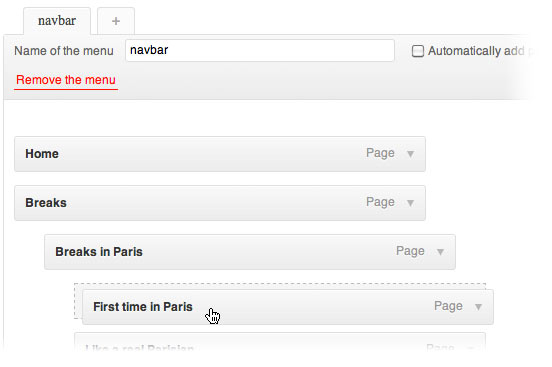
To get these pages to appear in the navigation menu correctly, you just have to drag and drop them into their respective positions in Appearance > Menus. Again, child pages are indented under their parent. Don’t forget to give the menu a name (like “navbar”, for example) and set it to be the primary navigation menu.
So, arranging pages in the WordPress Appearance > Menus area like this…

… will create a drop-down menu with fly-outs like this:

Please see the video above for a demonstration of this.
What do you think?
What do you think of this method of editing the header and navigation menu of a website? Do you do it in a different way?

Great tutorial Rob. I’ve finally got around to using WordPress now so your series will be really useful. Cheers.
That’s great, Mark, let me know if you need any help with WordPress. More to come in this series soon! 🙂
Great write up here Rob. I have been thinking about redoing my headers a little bit. I can think of a couple drop-downs and flyouts that will be good. I added this to my list of things to do.
Thanks for a great breakdown of how to get this done. I think it could be very useful.
Hey Steve, thanks a lot. Yes, I love drop-downs and fly-outs on menus – very intuitive so that the visitors instantly know what your site’s about. Very easily done with Genesis.
Hi,
Could you help me in adding few texts after the secondary navigation menu. Like in this website http://www.khmedia.in
Hello, could you send me an email, Jaibee, and I’ll see if I can help you.
Thanks for this really awesome post i’ve been trying to create header navigation for my twenty eleven theme from a lot of days but couldnt succeed in doing.But after reading your tut. I made my top nav for pages and main nav for categories.
Glad it helped, Geetha 🙂